webpack5の環境にeslintとstyled-componentをinstall
この記事は最終更新日から1年以上が経過しています。
今回は、eslintとstyled-componentをinstallしたいと思います。
こちら(webpack5でReact&Typescript環境構築)の記事の続きになります。
まずはeslintからinstallします。
Typescriptの環境なのでTypeScript ESLintを導入しました。
$ npm install --save-dev eslint typescript @typescript-eslint/parser @typescript-eslint/eslint-pluginそして.eslintrc.jsを作成します。
module.exports = {
  root: true,
  parser: '@typescript-eslint/parser',
  plugins: [
    '@typescript-eslint',
  ],
  extends: [
    'eslint:recommended',
    'plugin:@typescript-eslint/recommended',
  ],
};
lintを除外するディレクトリがある場合は.eslintignoreを作成しディレクトリを登録します。
# don't lint build output (make sure it's set to your correct build folder name)
dist
ではwebpack用にeslint-webpack-pluginをinstallします。
$ npm install eslint-webpack-plugin --save-dev
webpack.common.jsに追記しました。
const path = require('path');
const ESLintPlugin = require('eslint-webpack-plugin'); // 追記しました

module.exports = {
  entry: {
    app: './app/index.tsx',
  },

  output: {
    path: path.resolve(__dirname, 'dist'),
    clean: true,
    filename: '[name].js'
  },

  module: {
    rules: [
      {
        test: /\.tsx?$/,
        use: 'ts-loader',
        exclude: /node_modules/,
      },
    ]
  },

  resolve: {
    extensions: ['.tsx', '.ts', '.js'],
  },

  plugins: [
    new ESLintPlugin({
      extensions: ['tsx', 'ts'], // デフォルトがjsなのでtsxとtsを追記しました
    }) // 追記しました
  ],
};
では、一旦お試し動作確認をします。
無事に動きました。

続いてstyled-componentとstyled-componentの型ファイルを導入します。
公式ドキュメントはこちらです。(https://styled-components.com/docs/basics#installation)
app/index.tsxを下記に書き換えました。
import React from 'react';
import styled from 'styled-components';

const Button = styled.button`
  display: inline-block;
  color: palevioletred;
  font-size: 1em;
  margin: 1em;
  padding: 0.25em 1em;
  border: 2px solid palevioletred;
  border-radius: 3px;
  display: block;
`;

const TomatoButton = styled(Button)`
  color: tomato;
  border-color: tomato;
`;

const Test: React.VFC = () => {
  return (
    <>
      <Button>Normal Button</Button>
      <Button as="a" href="#">Link with Button styles</Button>
      <TomatoButton as="a" href="#">Link with Tomato Button styles</TomatoButton>
    </>
  )
}
動作が目視できるようローカルサーバーを構築します。
$ npm install --save-dev webpack-dev-serverwebpack.dev.jsにdevServerを追記をしました。
const { merge } = require('webpack-merge');
const common = require('./webpack.common.js');

module.exports = merge(common, {
  mode: 'development',
  devtool: 'inline-source-map',
  devServer: { // 追記しました
    static: './dist',
  },
});
package.jsonのscriptsも書き換えました。
"start": "webpack serve --open --config webpack.dev.js"
distディレクトリにindex.htmlを作成しました。
<html lang="ja">
  <head>
    <meta charset="UTF-8">
    <meta http-equiv="X-UA-Compatible" content="IE=edge">
    <meta name="viewport" content="width=device-width, initial-scale=1.0">
    <title>Document</title>
  </head>
  <body>
    <div id="test"></div>
    <script src="app.js"></script>
  </body>
</html>
ReactDomの型ファイルもinstallします。
$ npm install --save-dev @types/react-dom
dist/index.htmlのid="test"に描画するよう、app/index.tsxも書き換えました。
import React from 'react';
import ReactDOM from 'react-dom'; // 追記しました。
import styled from "styled-components";

const Button = styled.button`
  display: inline-block;
  color: palevioletred;
  font-size: 1em;
  margin: 1em;
  padding: 0.25em 1em;
  border: 2px solid palevioletred;
  border-radius: 3px;
  display: block;
`;

const TomatoButton = styled(Button)`
  color: tomato;
  border-color: tomato;
`;

const Test: React.VFC = () => {
  return (
    <>
      <Button>Normal Button</Button>
      <Button as="a" href="#">Link with Button styles</Button>
      <TomatoButton as="a" href="#">Link with Tomato Button styles</TomatoButton>
    </>
  )
}

// 追記しました。
ReactDOM.render(
  <React.StrictMode>
    <Test />
  </React.StrictMode>,
  document.getElementById('test')
);
ではサーバーを起動します。
$ npm start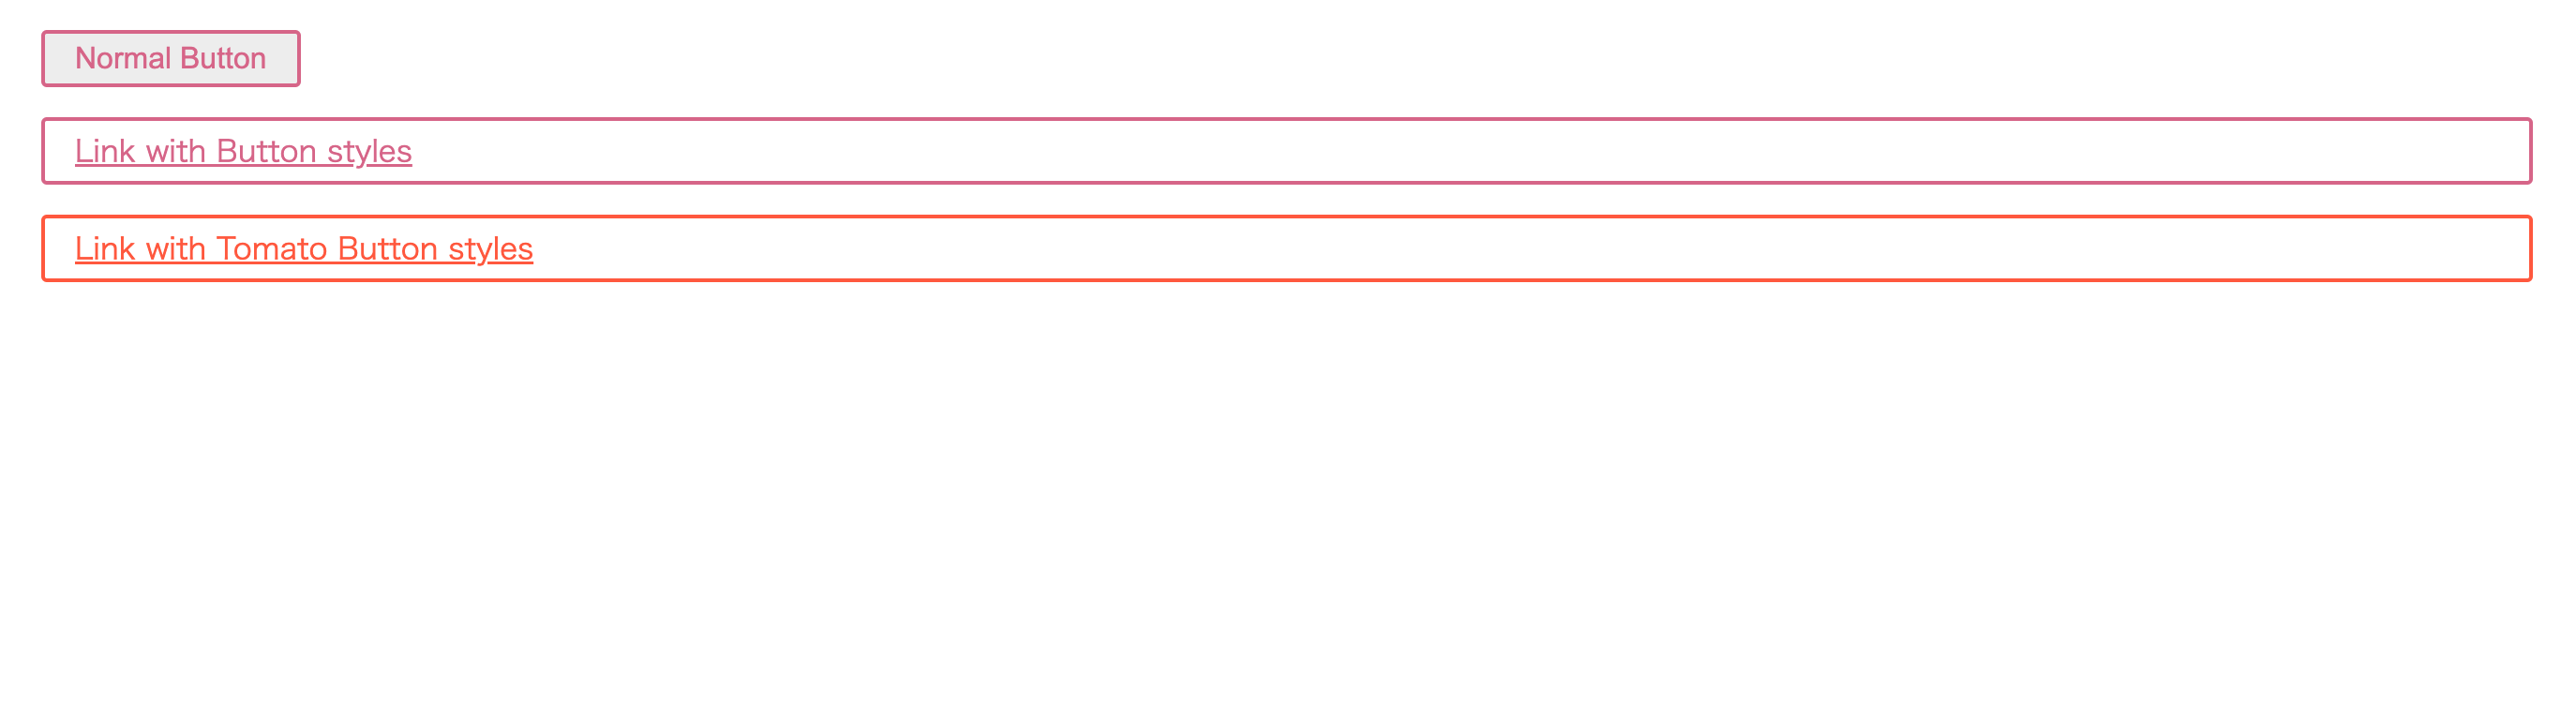
無事に動きました。
ここまでお読みくださりありがとうございました!